Designing a 36-key custom keyboard layout

GergoPlex keyboard by g Heavy Industries
Background #
Once you get into the world of custom mechanical keyboards, then you'll eventually run into keyboards with what looks like an impossibly small number of keys:
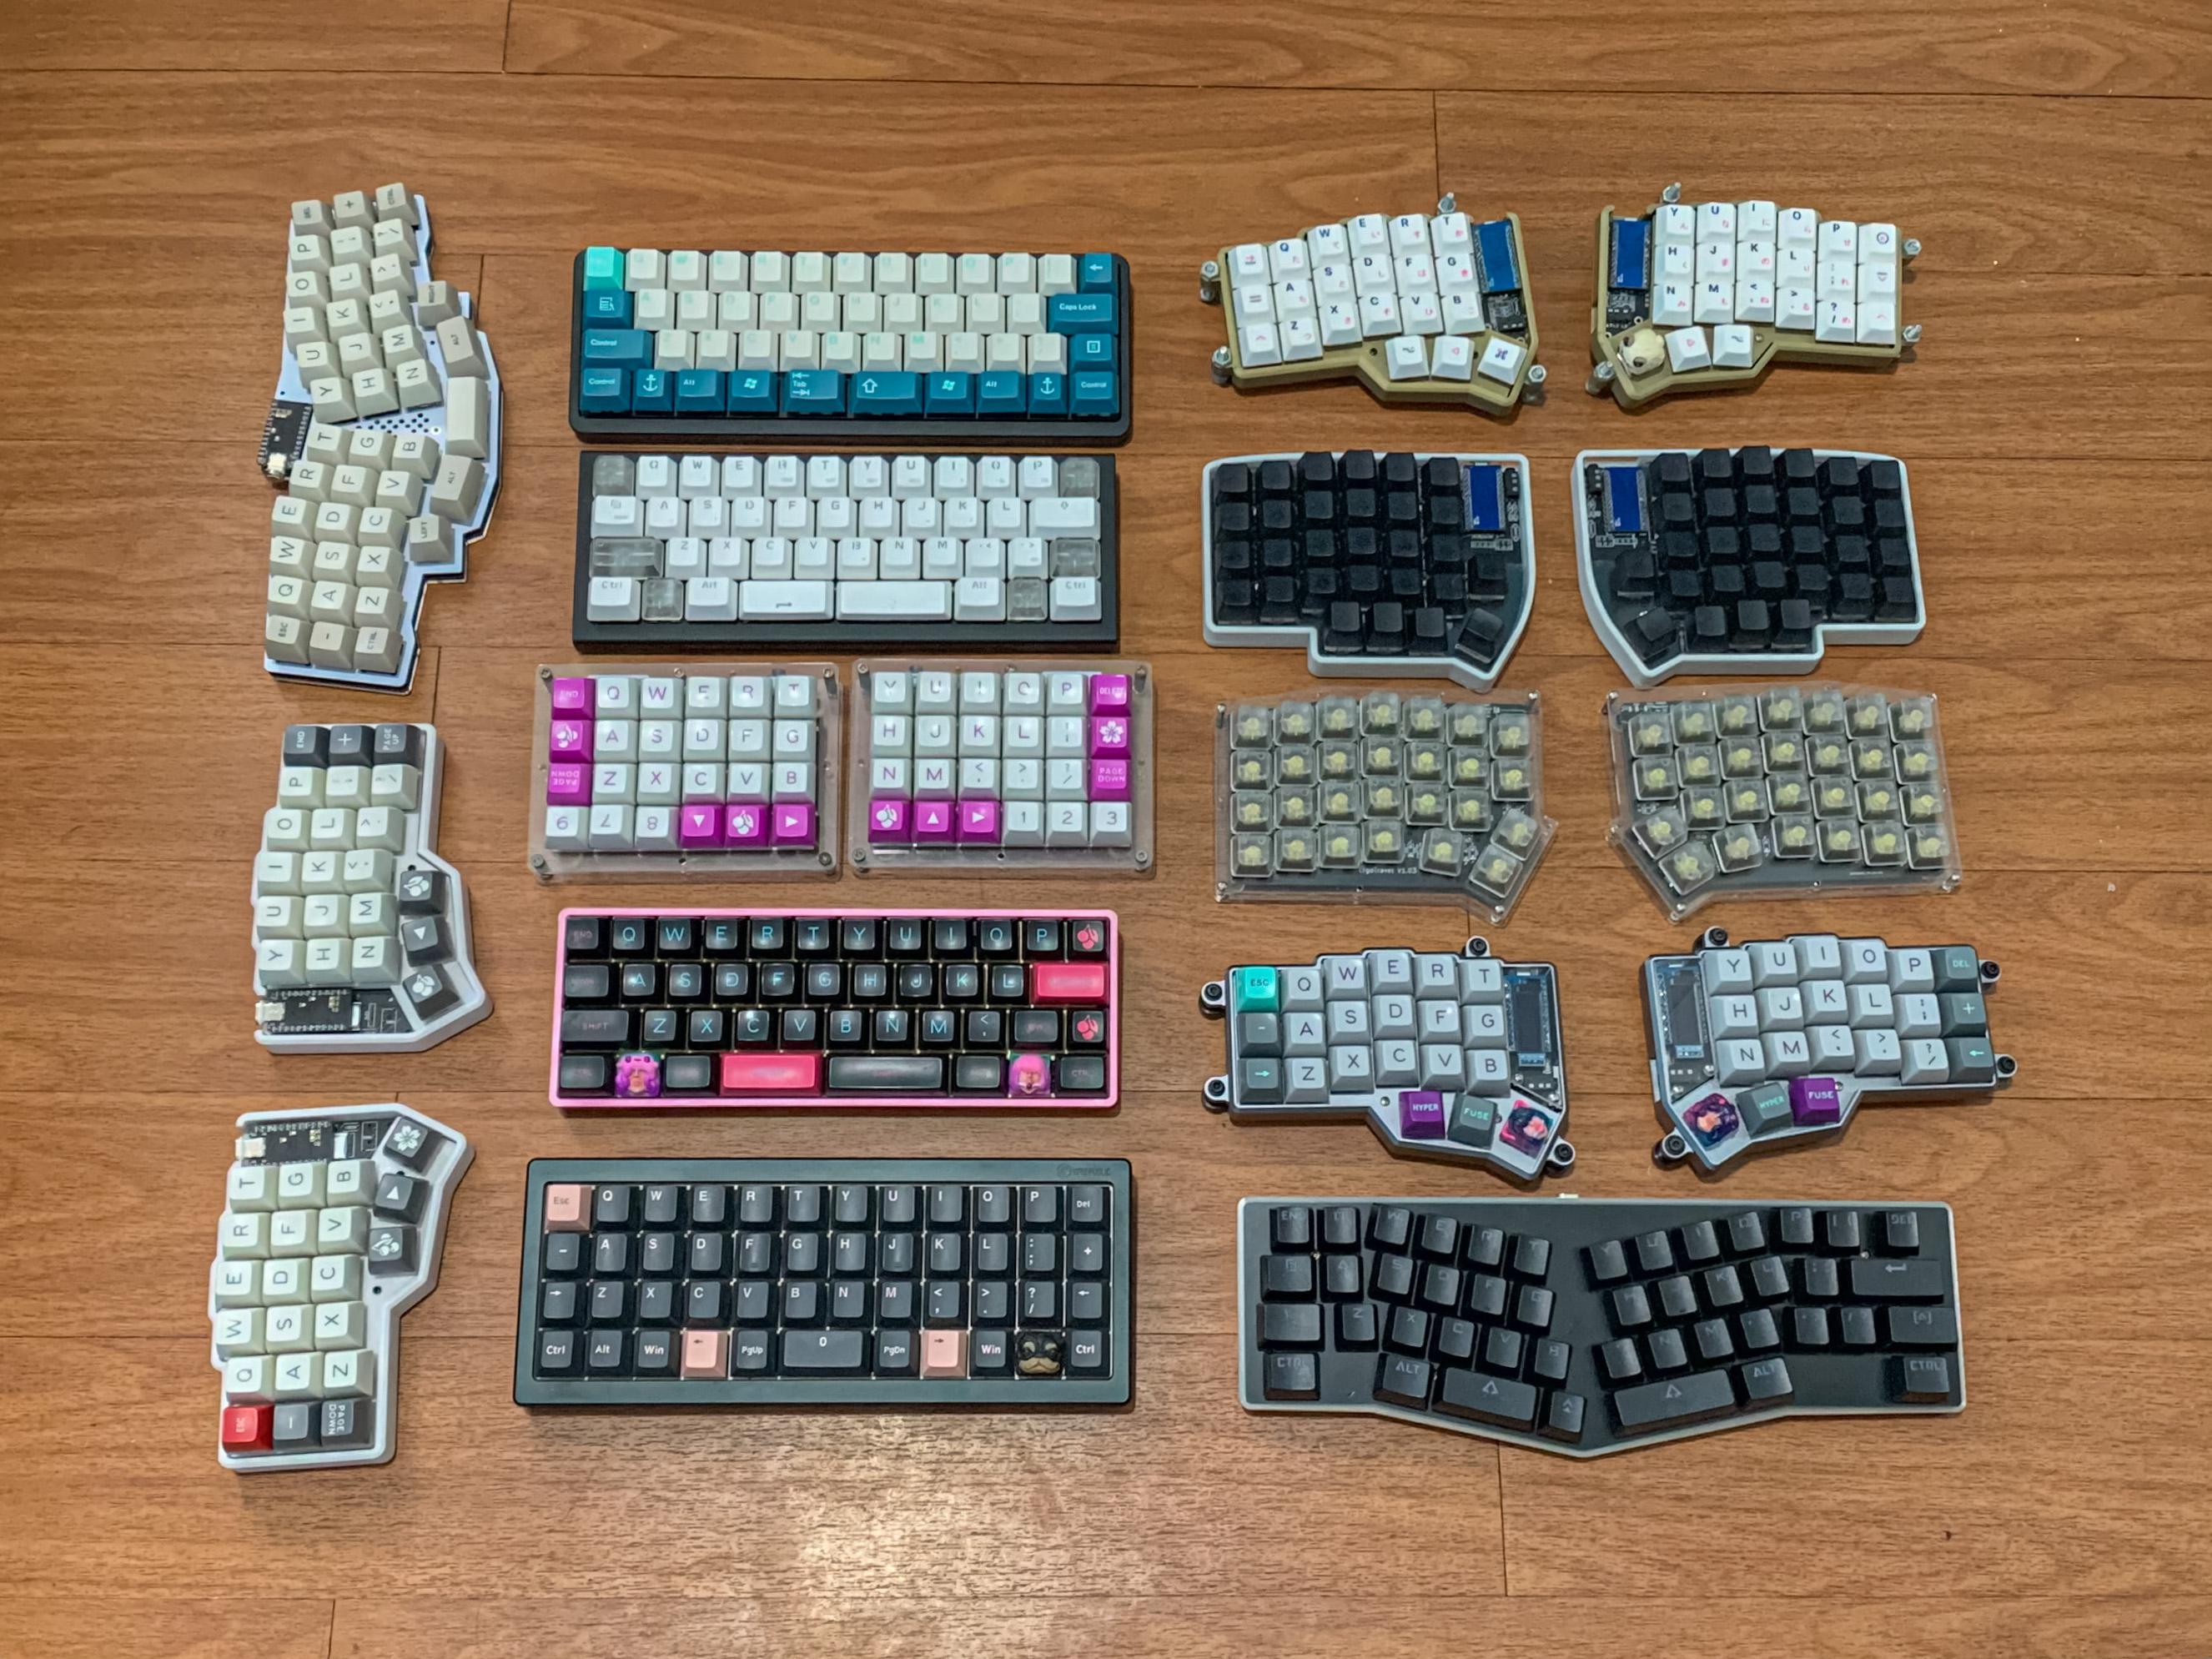
Ergonomic keyboard collection by u/chamzter22 from r/ErgoMechKeyboards
At first it may seem there is no good reason to build a keyboard like this, other than for aesthetic purposes or bragging rights. However, there are valid arguments to be made for reducing the number of keys on a standard keyboard. If you've ever tried to learn touch typing, then you were taught the importance of keeping your fingers on the home row. Yet there are many keys that force your hand to move off the home row. Even the number row can be hard to reach for people with smaller hands.
Here's the layout of a typical 78-key Mac keyboard, with the home row highlighted in green and all the keys that can take you off the home row highlighted in red:
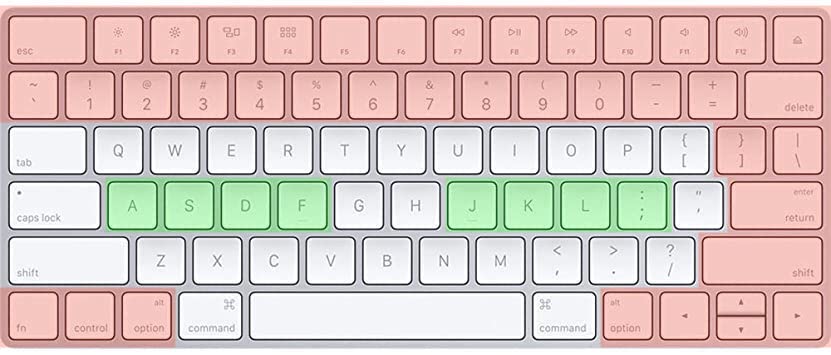
Your mileage may vary depending on how long your fingers are, but there certainly a surprising number of important keys that require a significant stretch. This is why many ergonomic keyboards are designed with fewer keys, from the 48-key ortholinear Planck, to the 42-key split columnar Corne, to the 36-key split columnar GergoPlex. (You can of course design a keyboard with even fewer keys, but I would argue 36 keys is about the limit for a normal typing experience using the English alphabet.)
So what happens to all the keys that you lose with these smaller keyboards? The answer is to use custom keyboard firmware with layers. In same way you can hold the Shift key to access special keys keys like !, @, #, etc., you can create custom layers to access those missing keys. This does require you to memorize a whole set of inputs and potentially relearn years of muscle memory. However, it is possible to design a layout that minimizes this learning curve by following a set of principles, which we'll look into next.
Prior art #
If you're looking for a 36-key custom keyboard layout, a commonly recommended one that I've come across is the Miryoku layout:
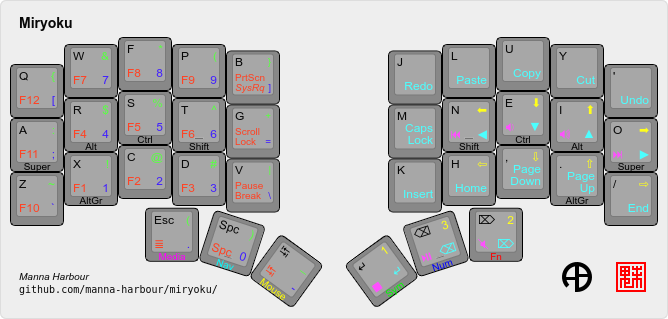
That looks intense! Each thumb key activates a different layer for a total of 6 layers, so there's a lot to get used to. Furthermore, the Miryoku layout uses home row mods - the Super, Alt, Ctrl, and Shift keys are on the home row instead of the thumb keys. For example, if you hold down the T key, it will work as the Shift modifier. If you tap it instead, the letter T will output instead. This definitely makes sense in theory, as your fingers are always on the home row. In practice, it'll take some tweaking to get it to work well, as there can be timing issues where sometimes you want the modifier to activate, sometimes you want the letter to activate. This article goes over home row mods and the necessary tweaks to make it work well in meticulous detail.
Another alternative to managing the available keys is to use combos:
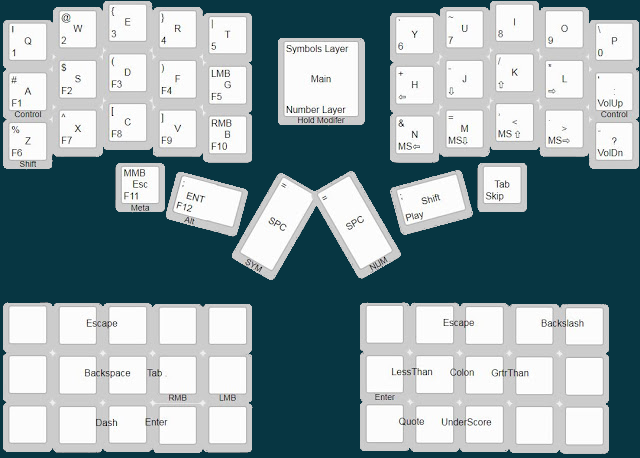
This is the default layout of the GergoPlex keyboard, described in detail here. Instead of using many different layers, this layout uses combo keys to activate different symbols. For example, pressing S and D simultaneously will trigger a Backspace, pressing J and K together will trigger a colon, etc. This provides a lot of interesting opportunities; however, there can be timing issues similar to home row mods. Also, pressing combos can be tiring if you happen to use heavy key switches.
In order to build these types of layouts, you'll need to program your own keyboard firmware. A popular open source keyboard firmware project is QMK, which allows you to program layers, combos, and many more features that enable you to map all the keys necessary to a 36-key custom keyboard. (You can get an overview of how to use QMK in my previous article.)
My design constraints #
Many people have found success with variations of the layouts described above. However, they didn't fit my particular needs, so I wanted to design something from scratch. Basically, I want to be able to switch between my 36-key custom keyboard and my normal laptop keyboard without issue. This doesn't seem to be a problem for some people, but for me, I noticed that I made a lot of mistakes reaching for the wrong keys when I switched between these different layouts. Keeping that in mind, these were the design constraints I used for my keyboard layout:
Avoid relocating keys whenever possible #
I found this to be essential if I wanted to switch between my custom layout and a standard keyboard. Many people redesign their layouts completely, using Dvorak, Colemak, or other non-QWERTY layouts. Which makes sense if your goal is to optimize ergonomics as much as possible. But that's not my goal - to me, reducing the key distance from the home row is ergonomic enough. My goal is to optimize other factors, namely minimizing the learning curve and minimizing the difficulty switching to a standard keyboard.
Keep any relocated keys on the same side they came from #
What this means is that the Escape key, which has to be relocated on a 36-key custom keyboard, will stay on the left side of the keyboard, the Enter key will stay on the right side of the keyboard, etc. This helps avoid any conflicts with keyboard shortcuts that involve two different hands (for example, Command Enter, which normally uses two different hands, would be difficult to execute if the Enter key was moved on the same hand as Command). I think this also helps with muscle memory, at least when I was experimenting. I tried moving the Tab key to the right hand, and my brain wasn't having it - moving it back to the left hand felt way more intuitive, even though it was a different position than normal. Again, your mileage may vary.
Avoid overloading commonly used letter keys #
When making custom keyboard firmware, you can program any single key to have multiple functions. The A key can be programmed to send A when tapped, send Control when held, send Tab when double-tapped, etc. This is an essential part of making a 36-key custom keyboard feasible. However, certain keys work better than others. Overloading the A key as in this example can cause errors when you type quickly - when you type "as", it may register as Control-S or "as" depending on how quickly you release the A key. You can tweak the firmware timings, but I'd rather avoid the issue altogether by not overloading these commonly used letter keys if at all possible.
Minimize the number of layers #
Some people find it effective to have many different layers, each with specific responsibilities. I tried this, but it didn't click for me to learn all these layers up front. Instead of making many single-purpose layers, I was able to make a single additional layer that contained all the commonly used symbols and navigation keys that didn't fit on the base layer. This made it easy for me to learn, as it helps you avoid having to remember what key was in which layer and activating the appropriate layer each time. Once you get used to a layout, it can definitely make sense to add additional layers, but this is a good constraint to start with in my experience.
Use mnemonic devices for positioning layer keys #
There are 78 keys on the standard Mac keyboard pictured above. That means for a 36-key custom keyboard, you need to memorize the positions of 42 keys that don't fit on the base layer. That's a daunting task, unless you have some mnemonic devices to aid your memory. For example, many layouts I've seen have the number keys rearranged to a numpad style formation. This is pretty cool, but it's more stuff to memorize up front. It's easier to start with the number keys in a layer directly across the top row, which is just one row down from where they are normally located. Similarly, the F1-F10 keys can go on a separate layer at the same positions - again, easy to memorize. Now we already have 20 out of the 42 keys taken care of with minimal effort! We can place the remaining keys in layers using similar mnemonic devices to keep the learning curve to a minimum.
These design constraints eliminated a lot of arbitrary choices, and led me to a keyboard layout that I'm pretty satisfied with.
My layout #
Here's the layout I created for a 36-key custom keyboard using the above design constraints:
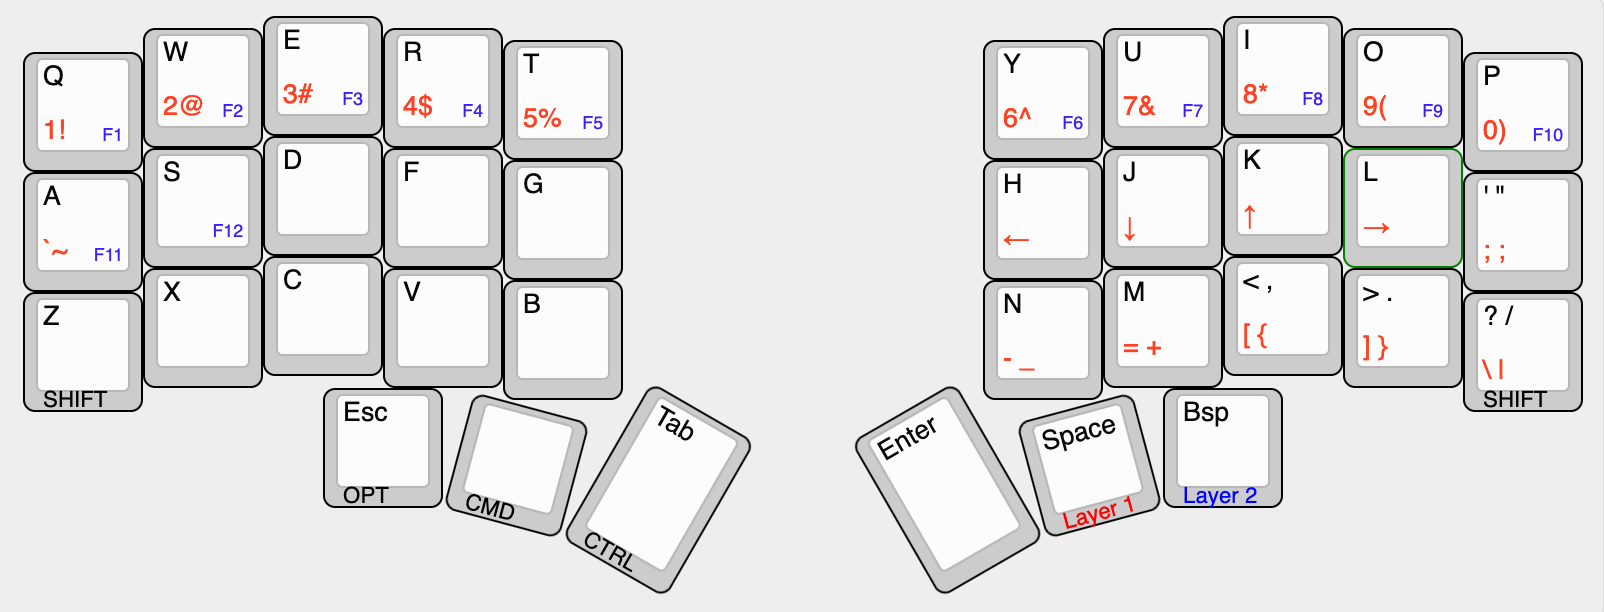
(This layout was designed specifically for Mac modifier keys, but it shouldn't be hard to adjust for Windows or Linux.) Nearly every key towards the middle of a standard keyboard are kept at their original positions. All relocated keys stay on the same hand. The layout doesn't overload any commonly used letter keys. There are only 2 additional layers (and all the commonly used symbols are on the first layer). Let's look over each layer in detail.
The default base layer #
/* Layer 0: Base keys
 *
 * ,-----.-----.-----.-----.-----.                      ,-----.-----.-----.-----.-----.
 * | Q   | W   | E   | R   | T   |                      | Y   | U   | I   | O   | P   |
 * |-----+-----+-----+-----+-----|                      |-----+-----+-----+-----+-----|
 * | A   | S   | D   | F   | G   |                      | H   | J   | K   | L   | ' " |
 * |-----+-----+-----+-----+-----+                      |-----+-----+-----+-----+-----|
 * |SHF/Z| X   | C   | V   | B   |                      | N   | M   | < , | > . |SHF/?|
 * `-----'-----'-----'-----'-----'                      `-----'-----'-----'-----'-----'
 *               .-------.-------.-------.      .-------.-------.-------.
 *               |OPT/ESC|  CMD  |CTR/TAB|      | ENTER |L1/SPC |L2/BSP |
 *               '-------'-------'-------'      '-------'-------'-------'
 */
The base layer is nearly identical to a standard layout, with Option, Command, and Space keys in the exact same positions (I happen to use my right thumb to hit space, but you can overload the left Command key to be space if you do the opposite). The Shift keys are in approximately similar positions (overloading infrequently typed letters, which works out perfectly). I did replace the semicolon key with the quotes key, because it is so frequently used, but this is an optional modification.
The Escape and Tab keys had to be relocated, so they now controlled by the left thumb. Same with the Enter and Backspace keys for the right thumb. Using your thumbs for these keys is a downright liberating experience. Those keys are used constantly throughout any work session, and you don't realize just how much your hands have to move hitting those keys until you bring them to a more usable position.
There is one downside to this layout - with the Tab key next to the Command key, it's difficult to hit Command Tab, an essential keyboard shortcut on a Mac. We'll come back to this at the end.
The symbols layer #
/* Layer 1: Symbols
 * ,-----.-----.-----.-----.-----.                      ,-----.-----.-----.-----.-----.
 * | 1!  | 2@  | 3#  | 4$  | 5%  |                      | 6^  | 7&  | 8*  | 9(  | 0)  |
 * |-----+-----+-----+-----+-----|                      |-----+-----+-----+-----+-----|
 * | `~  |HOME |PGUP |PGDN | END |                      |LEFT |DOWN | UP  |RGHT | ;:  |
 * |-----+-----+-----+-----+-----+                      |-----+-----+-----+-----+-----|
 * |SHFT |     |     |     |     |                      | -_  | =+  | [{  | ]}  |SHF\||
 * `-----'-----'-----'-----'-----'                      `-----'-----'-----'-----'-----'
 *               .-------.-------.-------.      .-------.-------.-------.
 *               |       |       |       |      |       |(hold) |       |
 *               '-------'-------'-------'      '-------'-------'-------'
 */
This layer is activated by holding down the right thumb middle key. Every commonly used symbol, including numbers and arrow keys, are on this layer. Most layouts I've seen have a separate layer for numbers and symbols. This seems to work for most people, but when I personally tried this, it messed with my head too much. I'm used to holding shift to get an !, which is how this layout works. Keeping my muscle memory and reducing the number of necessary layers is a win-win in my book.
I have Vim-style arrow keys here on the right hand home row, which is what I'm used to. If you're already comfortable with Vim, this is a great layout; if not, you may need to make some modifications (or spend some time learning Vim if you're so inclined). You can optionally add HOME/END/PGDN/PGUP keys on the left hand - these are less crucial, so experiment with rearranging them to something that makes sense for you.
The biggest learning curve is getting used to the remaining symbols that lost their dedicated keys (-_, =+, [{, }], and \|). I basically moved this cluster of keys to the bottom row of the right hand in order. The easiest way to remember this is to use some mental anchors. The open [{ key is at the same position as the base layer open <, key, and the close }] key is at the same position as the base layer close >. key. Also, the backslash \| key is at the same position as the base layer forward slash /? key. If you can remember those, then the only two left are the -_ and =+ keys at the remaining two positions. Again, you access the shifted versions of each of these keys by holding on shift as you would normally, so nothing new to remember there!
The function layer #
/* Layer 2: Function keys
* ,-----.-----.-----.-----.-----.                      ,-----.-----.-----.-----.-----.
* | F1  | F2  | F3  | F4  | F5  |                      | F6  | F7  | F8  | F9  | F10 |
* |-----+-----+-----+-----+-----|                      |-----+-----+-----+-----+-----|
* | F11 | F12 |PREV |PLAY |NEXT |                      |MUTE |Vol- |Vol+ | Br- | Br+ |
* |-----+-----+-----+-----+-----+                      |-----+-----+-----+-----+-----|
* |     |     |     |     |     |                      |     |     |     |     |     |
* `-----'-----'-----'-----'-----'                      `-----'-----'-----'-----'-----'
*               .-------.-------.-------.      .-------.-------.-------.
*               |       |       |       |      |       |       |(hold) |
*               '-----------------------'      '-------'-------'-------'
*/
This layer is activated by holding down the right thumb right key. I use this layer far less frequently than the symbols layer, but every function key is accounted for with room to spare. It's easy to remember the function key positions, as they are mentally anchored to the number key positions. You can optionally add volume controls, brightness controls, media keys, and any other miscellaneous keys as well - there's plenty of room.
Custom code #
I mentioned earlier that the only downside I found to the base layer was the difficulty in hitting Command Tab, which is a critical keyboard shortcut on the Mac. My solution to this is an odd one - I overwrote the keyboard shortcut to Command Q to be Command Tab instead, at a firmware level. It's worth mentioning that even before I started making this keyboard layout, I had disabled Command Q on my Mac (I was tired of accidentally quitting a program and losing all my tabs went I meant to enter Command W). So I didn't need this keyboard shortcut, and it is the closest physical location to Command Tab on a normal keyboard layout.
Here's the code to overwrite Command Q to be Command Tab using QMK if you're curious:
bool process_record_user(uint16_t keycode, keyrecord_t *record) {
  switch (keycode) {
  case KC_Q:
    if (record->event.pressed) {
      if (keyboard_report->mods & MOD_BIT(KC_LCMD) || keyboard_report->mods & MOD_BIT(KC_RCMD)){
        register_code(KC_TAB);
        return false;
      }
    } else {
      if (keyboard_report->mods & MOD_BIT(KC_LCMD) || keyboard_report->mods & MOD_BIT(KC_RCMD)){
        unregister_code(KC_TAB);
        return false;
      }
    }
    break;
  }
  return true;
};
To me, this is the perfect solution to my problem; however, I get that this may not be ideal for a lot of people. The good thing is that you have a lot of other options if you're using QMK. You could use tap dance to make double-tapping Q output a Tab key, or you could make a combo for QW to output a Tab key, or you could put Tab on some layer that's easily accessible, etc. There are endless possibilities when programming your own keyboard firmware; just be careful to keep these types of customizations to a minimum until you get used to your basic layout.
Next steps #
This layout has a lot of room for further customizations. There are many unused keys on the two additional layers, and there are keys available on the base layer to activate new layers if you're so inclined (the right thumb Enter key and the right pinky semicolon key are two good options). You could assign the right thumb Enter key as a Hyper key instead, which could be useful for other system-wide keyboard shortcuts.
If you're just getting started in the world of custom keyboard firmware, I'd recommend reading my previous post to get an overview of making a custom keyboard with programmable firmware. If you're looking to purchase a 36-key custom keyboard, there aren't too many vendors that mass produce them, as it's a pretty niche market. The Keyboardio Atreus is one of the more affordable mass produced options that can fit the bill; it's got more than 36 keys, but it should work well with this layout, and you can use the extra keys as you see fit. Otherwise, you can purchase parts or prebuilt options from smaller vendors who will make it to order, which will take more time. A good place to get advice is the /r/ErgoMechKeyboards subreddit, where they have a sticky to help you find the exact keyboard that meets your needs.
If after reading all this, you're not convinced it's worth it to switch to a 36-key custom keyboard, then I would definitely stick with your current preference. The ergonomics are a definite plus for some people who experience wrist or joint pain, but for most people this is probably not an issue. I would recommend getting into ergonomic keyboards the same way I would recommend someone to learn Vim; it should be because you enjoy spending time learning and mastering a complex skill, like learning a new musical instrument.
If you're already using a small keyboard with minimal keys, it's worth restating that I don't believe my layout is the best layout for everyone. If you've spent the time to master non-QWERTY layouts, home row mods, combos, or other advanced features, then you should use a layout that takes full advantage of your knowledge. But I do believe this layout is ideal as a starting point for most people, as it gives you the ability to be productive in the shortest amount of time. Once you feel comfortable with this layout, then you should definitely add more features incrementally, which is half the fun of building your own keyboard. Hope you find these tips useful on your journey!