Your First Custom Ortholinear Keyboard
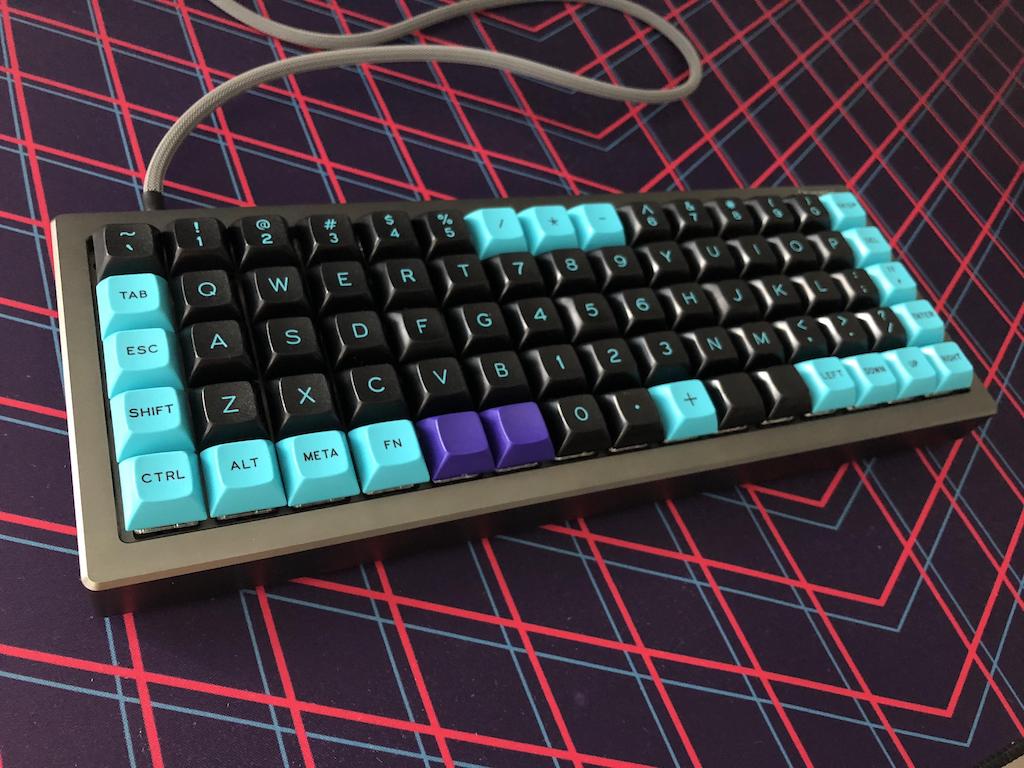
Custom ortholinear keyboard by u/ImportedGuy from r/mk
If you're a person who types on a keyboard for most of the day, then you may have come across the world of custom keyboard enthusiasts. One notable keyboard community is Reddit's mechanical keyboards subreddit, where you'll find a dizzying array of customization options, from switches to keycaps to keyboard layouts. Some of these customizations are purely cosmetic, some are in search of a particular tactile or aural aesthetic, and some are for improved ergonomics.
Staggered vs Ortholinear Layout #
One interesting customization from the world of custom keyboards is an ortholinear layout. An ortholinear layout has all the keys organized in a straight up and down grid, as opposed to the staggered layout of traditional keyboards.
Here is a traditional staggered keyboard layout:
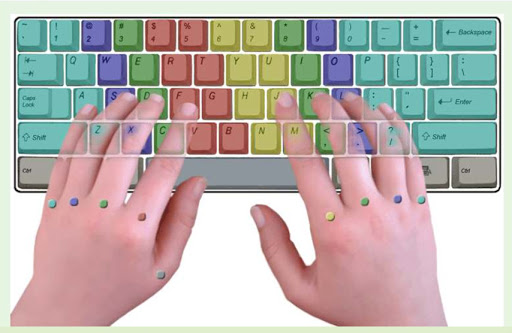
Note the color coding based on finger positions. For proper touch typing, each finger is responsible for a certain set of keys. What's odd is due to the staggered nature of the keyboard, these sets of keys are all on a slant. This makes it a little tricky to learn. For example, the right index finger rests on the J key, and is responsible for the number 7. But you can see that 8 is the number key directly above the J key, which can create some cognitive dissonance. So why do most keyboards use a staggered layout? It's because they were modeled after old-school typewriters, which needed the staggered layout to make room for each hammer:
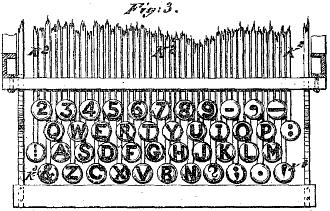
So most modern computer keyboards are designed with this staggered layout due to path dependency; it's just what people are used to. Once you realize this, it's hard not to ask the question "What would it be like to use a keyboard without any staggering?"
Enter the ortholinear layout:
From what I can tell, the term "ortholinear" was invented by Jack Humbert, who created the Planck keyboard described in the video. The Planck may not have been the first non-staggered keyboard on the market, but it was very influential in the relatively small world of custom keyboard enthusiasts. Originally you would have to buy keyboards like these as a kit, which required soldering and assembly to complete. Now there are quite a few pre-built ortholinear keyboard options to choose from - there's the minimalist Planck EZ, the ergonomically curved Kinesis Advantage, the fully-split Moonlander, etc. Prebuilt options are quite pricey, since it's a small market, so if you wanted to save money you could build your own from the individual components.
The ortholinear learning curve #
Before getting into how to build a custom ortholinear keyboard, it's worth mentioning the learning curve. I've come across multiple reviews of different ortholinear keyboards where the reviewer said the layout change was too much of a learning curve, and they prefer the staggered layout. Here are some example video reviews which discuss just how difficult the switch can be:
- Rhinofeed's Planck review
- Chryosan's Planck review
- Laptop Retrospective's GergoPlex review
- Jarred Walton's Kinesis Advantage review
This wasn't at all similar to my experience with my first ortholinear keyboard. It took me about a day before I was just as fast on my new keyboard, and I was also able to switch between an ortholinear layout and my laptop's staggered layout without any issue. This is because my first ortholinear board was the XD75re, which has plenty of keys (5 rows and 15 columns), so I was able to create a layout that was nearly identical to a traditional keyboard.
First let's look at the default layout on a Planck keyboard:
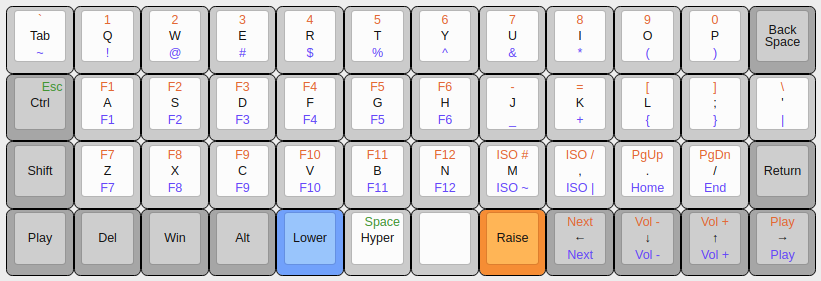
The Planck has 4 rows and 12 columns, which means you're missing your number row and a lot of symbols. In order to type numbers, you'll need to hold down the Raise key, which activates the color-coded layer. Other symbols require holding the Lower key. The reasoning here is to keep every single key no more than one key away from your home row position, which is ideal from a touch typing perspective. But there is a huge learning curve involved with switching to a keyboard like this! The Planck allows you to customize your layout any way you want, but in the end you'll have to relearn where your numbers and symbols are located using several layers.
Now let's look at a layout on the XD75re:
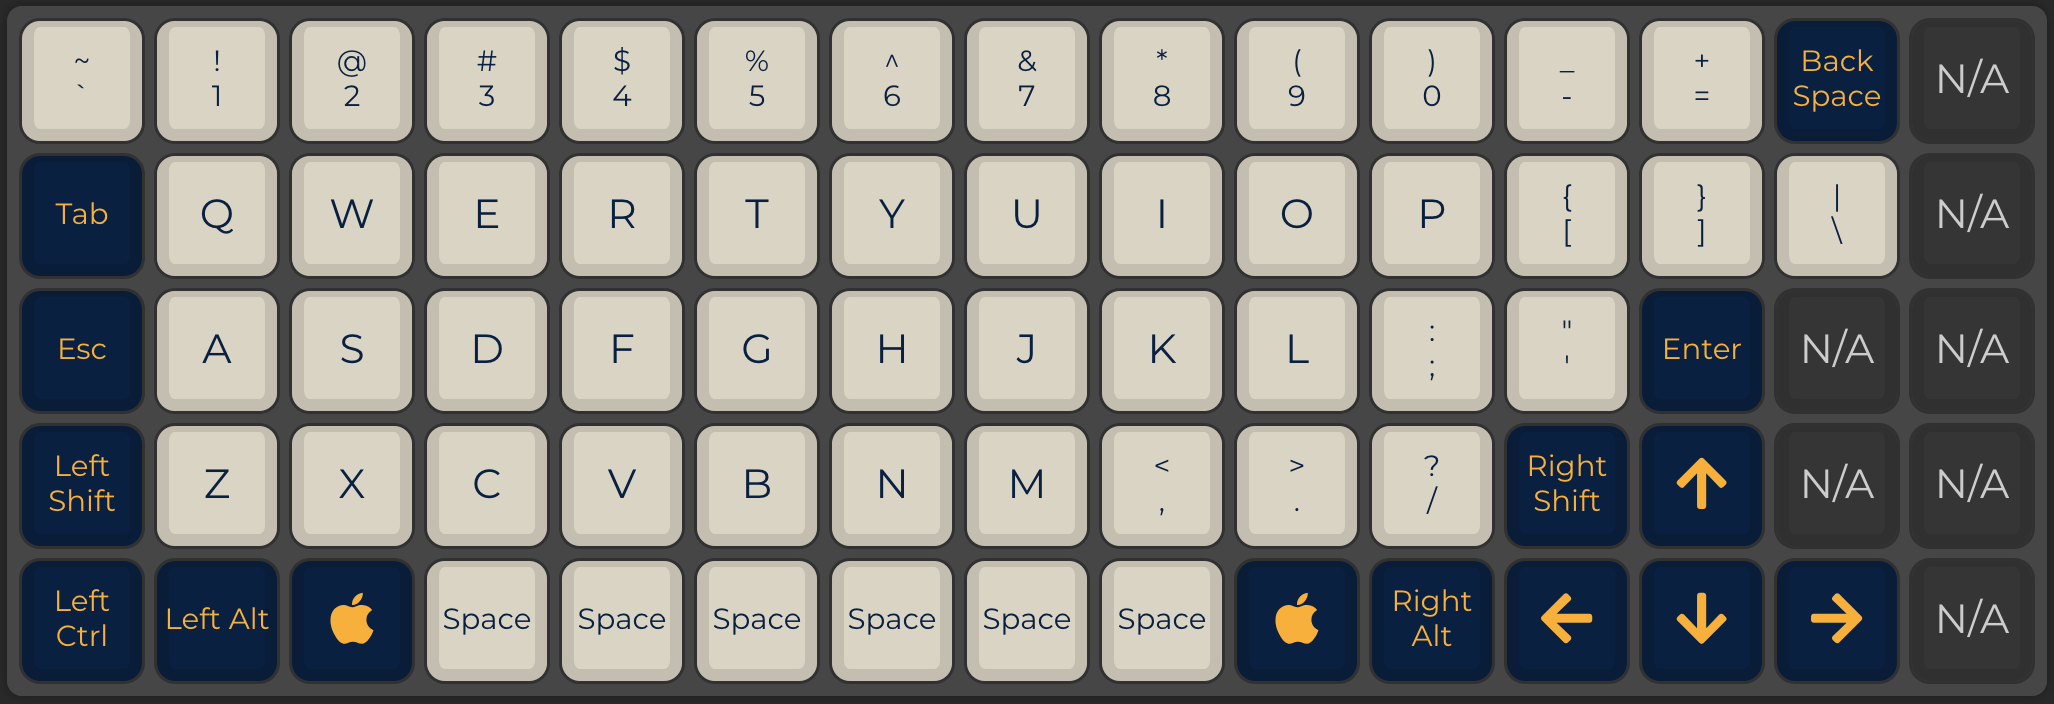
This layout uses 14 columns, with extra keys left over to customize as you see fit. The only key that is moved is the escape key, which I moved to the normal location of the caps lock key (you can actually customize this keyboard's firmware such that the key is control on hold, escape on release). The most important thing is that you aren't required to use any layers to access your numbers or symbols (except for your function keys, which can map directly on your number keys).
Notice that the space bar takes up a huge number of keys, which isn't necessary. If you are okay with moving 2 more keys around, you could have a layout like this instead:
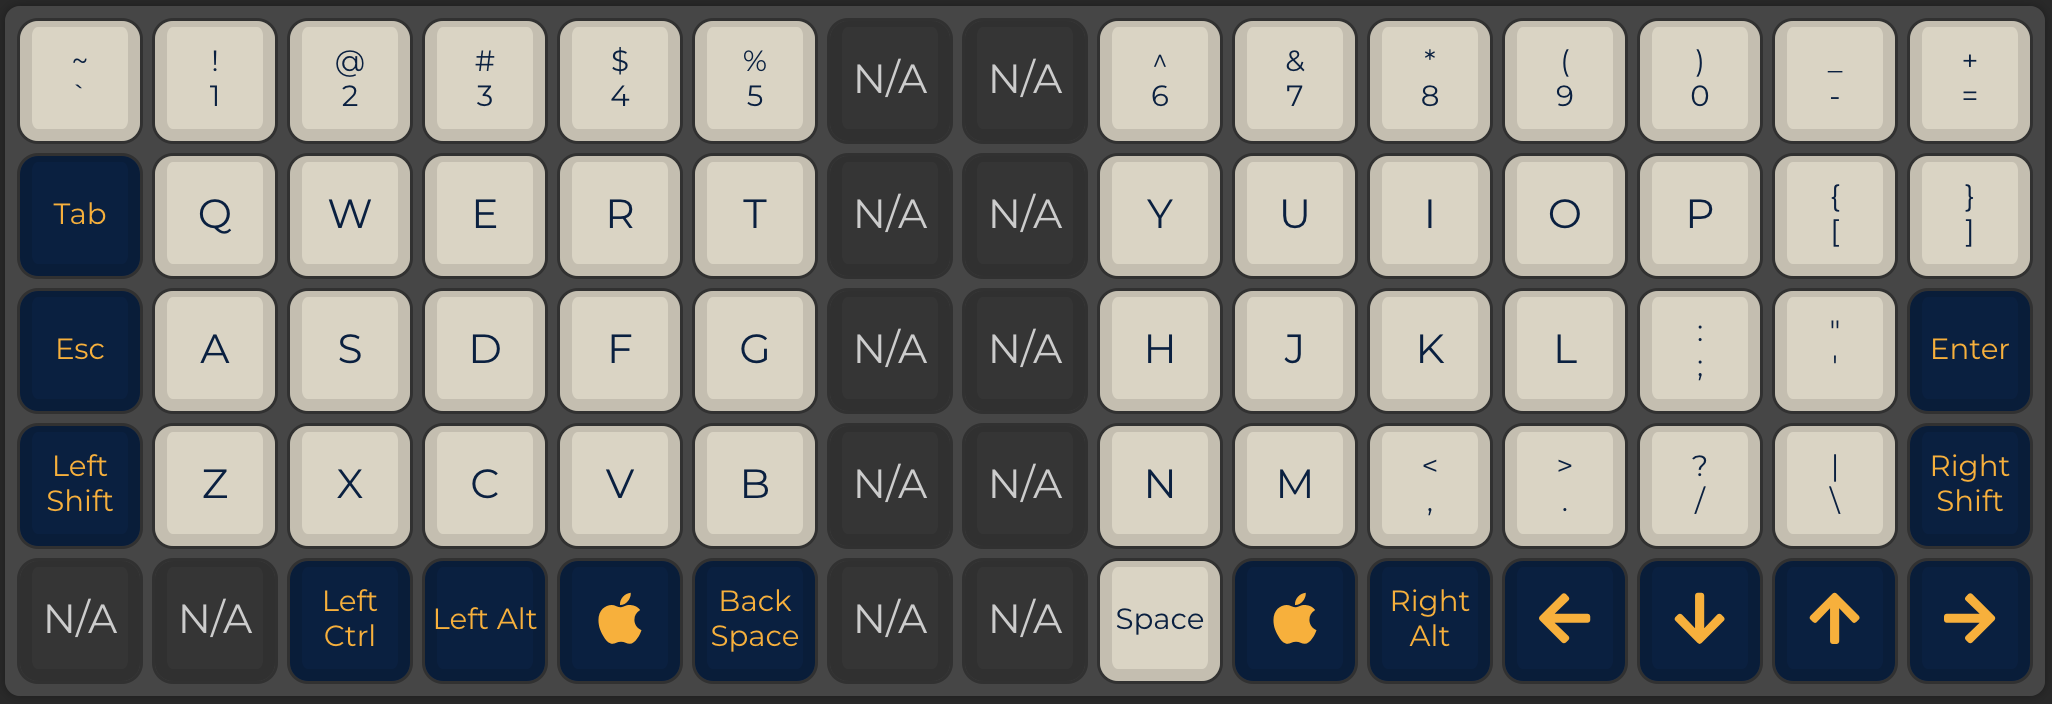
This layout uses 13 columns, with 2 extra columns in the middle and a couple of unused keys on the bottom to customize as you see fit. The extra two columns in the middle creates some space between your hands, which I find to be a little more comfortable. Only 3 keys are out of their normal positions, so it's pretty easy to get used to this layout. The point is that this particular keyboard gives you the flexibility to start with a traditional layout so you can focus on getting used to a non-staggered ortholinear layout. Once you feel comfortable, you can customize your layout to your heart's content!
If you're interested in trying an ortholinear layout, I would suggest trying a keyboard with labeled keycaps and at least 5 rows and 13 columns. Most available ortholinear keyboards have 12 columns, which keeps things symmetric (6 columns for each hand), but immediately requires repositioning several symbol keys on layers. You'll have a much easier time learning an ortholinear layout if you don't have to memorize new layer layouts at the same time. You can always add layers and optimize your layout with a larger keyboard as well, so it's a win-win!
Building a keyboard from scratch #
The only downside with the XD75re is that it does not come as a prebuilt keyboard, you'll need to source your own parts and assemble it yourself. Fortunately, this is all a lot easier than it sounds, because the XD75re board has all components already soldered on it. This means all you need to do is purchase the right parts and put it all together, no wiring or soldering necessary!
This video by Taeha Types does a good job of breaking down all the possibilities when it comes to building your own mechanical keyboard:
This particular build is as simple as it gets, since the XD75re is a hot-swap PCB, which means you don't need to solder any components. It is compatible with either PCB or plate-mounted switches, which makes it easier to find switches. And since every key is only 1 unit in size, you don't need any stabilizers. All you need to do is assemble the pieces. Here's what you need for this XD75re build:
- PCB (KPRepublic sells the XD75re)
- Case (the XD75re can theoretically fit in any 60% case, this one is specifically built for the XD75)
- Switches (the XD75re uses MX switches, sold by NovelKeys, FlashQuark, many others)
- Keycaps (you'll need uniform-profile MX keycaps with all 1u sizes, like this)
- Plate (sometimes optional, the case linked above has a built-in plate)
- Cable (the XD75re uses a USB C cable)
You can follow this build log by /u/snowypowers to see how to assemble this exact board with this exact case:
One thing to note - I have this exact case, and the screws it came with were too short. This is probably because the case was made for the XD75 and the XD75re PCB, the latter being a little taller in height due to its hot-swap sockets. I had to purchase some longer M2 screws, which cost less than a dollar total. Easy enough fix, but something to be aware of.
The total cost of this build will be somewhere between 100 and 200 USD. Which is a pretty reasonable price for a custom keyboard, but definitely pricey compared to something you can buy at a store, no doubt. And this particular PCB is sold by KPRepublic, a store located in China, which means it will take more than a month to receive your package (I believe my order took about 2 months to ship to the US in Chicago). I had a great experience with KPRepublic and have ordered from them multiple times, but you can't avoid the long wait times for certain products like these, which are manufactured by small local vendors and not large corporations. Building custom mechanical keyboards is a great hobby, but it's characterized by long wait times and potentially expensive purchases. If that's unappealing, then turn around before it's too late! Otherwise, let's take a look at the last piece of the puzzle - programming your new keyboard.
Customizing the keyboard firmware #
The XD75re can be customized using the QMK firmware, which is an open source keyboard firmware project that enables complete customization of your keyboard. If you are a programmer, you can write custom C code to program your keyboard down to each keypress. If you are not a programmer, no worries - they provide an online graphical configuration tool which is much more user friendly. This tutorial by MechMerlin walks you through every step:
This is the fun part - you have complete control of the layout and functionality of each key. You can have dedicated buttons to control volume, brightness, and media playback. You can customize a key to be Control on hold, Escape on release, as I mentioned earlier. Literally every key can have a wide range of functionality. To start, I'd recommend keeping things simple, but once you get the hang of your layout, it's a lot of fun to revisit it and try to optimize it for your tastes!
Once you create your firmware using this online tool, you will need to load the compiled code onto your keyboard, a process known as flashing your keyboard.
Flashing the XD75re the first time is tricky, because it doesn't come with a reset button. The product page links to some documentation which is pretty unclear, as the instructions are for some firmware other than QMK. However, the first step is all you need - when your board is plugged in and ready to be flashed, you can reset the board by using paperclips or tweezers to short the two pins labeled in the picture:
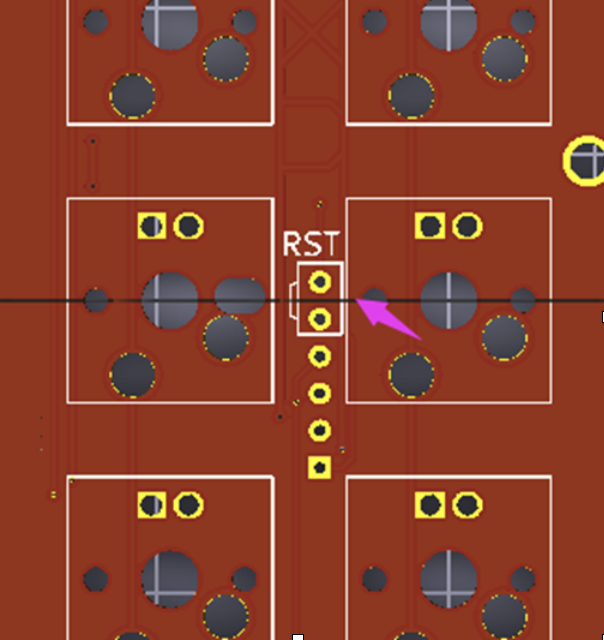
If you're using the case from the steps above, you can see a cutout at the top of the case that gives you access to those specific pins at the exact center of the board (if you remove the keycaps). This is kind of an annoying process, but fortunately you don't have to do it often. When you design your keyboard layout, you can choose one of your keys to be a reset key. I would recommend putting it behind a layer so you don't press it accidentally. Once it's set, you can reset your keyboard with a key combination instead of having to remove those middle keys and short the pins from the top, which is a lot more convenient.
Conclusion #
If you are used to purchasing pre-built keyboards, the world of custom mechanical keyboards can certainly seem daunting. However, if you're willing to be patient through the different steps of choosing parts, assembling the keyboard, creating a layout, and flashing the firmware, then I definitely believe the payoff is worth it. If a Jedi constructs their own lightsaber from scratch, then anyone who uses a computer all day for a living should consider doing the same for their keyboard.
If you're interested in entering the world of ortholinear keyboards specifically, the XD75re PCB is pretty hard to beat, since it has plenty of buttons to avoid memorizing layers, it has compatibility with different types of switches, and it is hot-swappable so you can change switches without having to do any soldering. A lot of enthusiasts enjoy optimizing their layouts to use as few keys as possible, but starting with too many keys is the way to go, since you can always learn to use fewer keys using the same board. If you do get into the hobby, I hope you find this information helpful to begin your journey!